
Fertilization
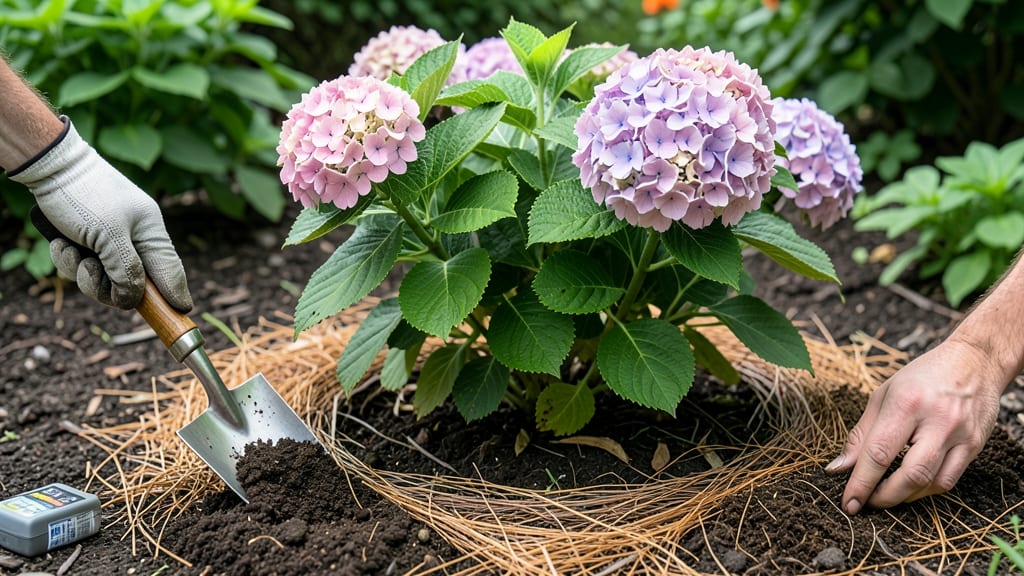
Your hydrangeas won’t hit their full color potential until you amend the soil—trust me, I’ve watched mine go from lackluster to showstopping after just one season of proper prep. The secret isn’t just adding acid; it’s balancing drainage, nutrients, and organic matter so roots thrive year-round.
My blue hydrangeas now bloom so vibrant they look like they’re lit from within, and it all starts with the soil.
Most gardeners overlook drainage first, but hydrangeas hate soggy roots. If your soil stays wet for more than a day after rain, mix in 2-3 inches of coarse sand or perlite per square foot.
For heavy clay soils, I blend in equal parts compost and peat moss—this lightens the texture while keeping moisture where it belongs. Sandy soils? Add aged compost and a sprinkle of sulfur to hold onto nutrients longer.
Test your pH before you start: hydrangeas need 5.0-6.0 for those signature blue blooms (or 5.5-6.5 for pinks).
After amending, your plants will reward you with stronger stems, bigger buds, and blooms that last well into fall. The key is patience—give roots 4-6 weeks to adjust before expecting dramatic changes.
I swear by a mid-season top-dressing of alfalfa meal for extra nitrogen, and I never skip mulching with pine needles to maintain acidity naturally. The first flush of new growth always tells me if I got it right: glossy leaves and tight buds mean you’re on the right track.
This method works for container-grown hydrangeas too—just use a well-draining potting mix with added peat moss and adjust pH with liquid sulfur if needed.
Whether you’re dealing with clay in the Midwest or sandy soil in the South, the principles stay the same: feed the roots, balance the pH, and keep it moist but not soggy.
Once you’ve got this down, your hydrangeas will be the envy of the neighborhood—and you’ll finally understand why they’re worth the effort.
📚 In This Guide
- What you need
- Instructions
- Tips and common mistakes
- Wrapping up and next steps
What you need
- ● Sphagnum peat moss – 2-3 gallons per 10 sq ft (for acidity and moisture retention).
- ● Composted pine bark fines – 1-2 gallons per 10 sq ft (adds organic matter and acidity).
- ● Elemental sulfur – 1-2 lbs per 100 sq ft (lowers pH gradually).
- ● Garden lime (calcium carbonate) – Only if raising pH (use sparingly!).
- ● Well-rotted manure or compost – 1-2 inches spread evenly (boosts fertility).
- ○ Aluminum sulfate – Optional but helpful for quick acidity boost (follow package rates).
- ● Garden tiller or spade – For mixing amendments 12-18 inches deep.
- ● pH test kit or meter – To monitor soil acidity (ideal range: 5.2-6.0).
- ● Gloves and protective eyewear – For handling sulfur and other amendments.
- ● Soil probe – Checks moisture and compaction levels.
- ● Wheelbarrow – For hauling heavy amendments.
- ● Rain barrel or hose with slow setting – Ensures even watering post-amendment.
- ● Mulch (pine needles or wood chips) – 2-3 inches thick to maintain acidity.
Step-by-step guide to amending soil for hydrangeas
Here's how to create the perfect acidic environment that hydrangeas crave for those showstopping blooms.
Test Your Current Soil pH
Before making any changes, grab a soil pH test kit—available at garden centers—and follow the instructions to determine your soil's current acidity. Hydrangeas thrive in pH 5.2 to 6.0, so if your test reveals a higher number, you’ll need to lower it. I like to test in multiple spots around the planting area, as pH can vary even within a small garden. Dig a 4-inch deep hole and collect soil samples from the root zone where your hydrangeas will grow.
If you’re impatient for results, you can also use a quick-test kit that gives you a color-coded reading in minutes. This is especially helpful if you’re working with a tight timeline before planting. Just remember: hydrangeas are sensitive to pH shifts, so gradual adjustments work best. If your soil is already in the ideal range, you can skip straight to organic matter incorporation.
Incorporate Organic Matter for Structure and Acidification
Break out the 2-3 inches of composted pine bark fines and 1-2 inches of well-rotted leaf mold—these are your best friends for hydrangeas. Pine bark isn’t just acidic; it also improves drainage, which hydrangeas need to prevent root rot. Mix these into the top 6-8 inches of soil where the roots will spread, using a garden fork or tiller to blend them thoroughly.
For an extra boost, add 1-2 cups of peat moss per planting hole if your soil is particularly alkaline. Peat moss lowers pH while also holding moisture, which hydrangeas appreciate. Avoid fresh pine needles or sawdust—they can tie up nitrogen and slow plant growth. Instead, opt for aged, composted materials that break down slowly and provide steady benefits.
Adjust pH with Sulfur or Aluminum Sulfate
If your soil test shows a pH above 6.0, it’s time to lower it. For mild adjustments, sprinkle 1-2 pounds of elemental sulfur per 100 square feet of soil and work it into the top 6 inches. Sulfur reacts slowly, so you’ll need to retest in 2-3 months and reapply if needed. For faster results, use aluminum sulfate at a rate of 1-2 tablespoons per gallon of water, applying it as a soil drench.
Here’s the thing—hydrangeas are heavy feeders, so don’t overdo it with sulfur. Too much can make the soil too acidic, which stresses the plant. After applying, water the area deeply to help the amendments dissolve and spread evenly. If you’re unsure about the exact amount, start with the lower end of the range and monitor the plant’s response over the next few weeks.
Mulch to Maintain Acidic Conditions
Spread a 2-3 inch layer of pine bark mulch over the amended soil, keeping it 2-3 inches away from the plant stem to prevent rot. This mulch doesn’t just look great—it slowly releases acidity as it breaks down, keeping the soil pH in check. Replenish the mulch layer every 6-12 months to maintain its effectiveness.
For an added touch, mix in a handful of coffee grounds (if you have them) into the mulch. Coffee grounds are slightly acidic and provide a mild nitrogen boost, though they should only make up a small portion of your mulch. Avoid using fresh coffee grounds, as they can compact and create anaerobic pockets in the soil. Instead, use composted grounds or mix them into the soil before planting.
Monitor and Maintain Soil pH Annually
Hydrangeas are finicky about pH, so test your soil every spring before new growth begins. If the pH drifts outside the 5.2-6.0 range, repeat the sulfur or aluminum sulfate treatment as needed. I also like to add a slow-release acid-loving plant fertilizer in early spring to provide the nutrients hydrangeas need without disrupting the pH balance.
Watch your hydrangeas closely—they’ll tell you if something’s off. Blue blooms mean the soil is acidic, while pink flowers indicate a more neutral pH. If you want to experiment with color, you can even adjust the pH slightly to shift the hue, but keep it within the 5.0-6.5 range for best results. With consistent care, your hydrangeas will reward you with lush foliage and vibrant blooms year after year.
Tips & tricks for perfect hydrangea soil amendments
Creating the ideal acidic environment for hydrangeas takes a few strategic moves—here’s how to avoid common pitfalls and get the most out of your soil prep.
Testing Accuracy: When using a soil pH test kit, collect samples from multiple spots around your planting area since pH can vary by as much as 1.5 points in different sections of the same garden. I’ve seen gardeners skip this step and end up with inconsistent results—hydrangeas need that 5.2-6.0 range consistently across their root zone. If you’re using a quick-test kit, take readings in the morning when soil moisture is more stable, as afternoon heat can skew results.
Organic Matter Layering: The 6-8 inch depth for incorporating pine bark fines and leaf mold is non-negotiable—this is where hydrangea roots will actively seek nutrients. Don’t just sprinkle these on top; use a garden fork to gently loosen the soil and create pockets for the amendments to integrate. For particularly dense clay soils, consider adding a 1-inch layer of coarse sand (optional) to improve drainage while maintaining acidity.
Sulfur Application Strategy: Elemental sulfur is your slow-release acidifier, but timing matters. Apply it in early fall rather than spring to give it 2-3 months to work before planting season. I’ve learned the hard way that rushing sulfur applications can stress plants—always follow up with a pH test before planting. For aluminum sulfate, mix it with water first to create a uniform solution, then apply with a watering can for even distribution.
Mulch Maintenance: That 2-3 inch layer of pine bark mulch isn’t just decorative—it’s your long-term pH regulator. Refresh it annually in early spring before new growth begins. Pro tip: If you notice the mulch breaking down too quickly (within 6 months), add a ½-inch layer of fresh composted pine bark to extend its effectiveness without overwhelming the soil.
Pro Tips for Amending Soil For Hydrangeas
- Creating the ideal acidic environment for hydrangeas takes a few strategic moves—here’s how to avoid common pitfalls and get the most out of your soil prep.
- Testing Accuracy: When using a soil pH test kit, collect samples from multiple spots around your planting area since pH can vary by as much as 1.5 points in different sections of the same garden.
- Organic Matter Layering: The 6-8 inch depth for incorporating pine bark fines and leaf mold is non-negotiable—this is where hydrangea roots will actively seek nutrients.
Frequently asked questions
Got questions about creating the perfect soil mix for your hydrangeas? Here are some of the most common concerns—and their answers!
How often should I amend the soil for hydrangeas?
For established hydrangeas, amend the soil once a year—ideally in early spring (before new growth) or fall (after blooming). If your soil is extremely alkaline or compacted, you may need to adjust it more frequently. Test soil pH annually to monitor changes.
Can I use coffee grounds to acidify the soil?
Yes! Coffee grounds are a natural, organic way to lower pH, but use them sparingly—mix 1/4 cup per plant into the top 2 inches of soil. Avoid overdoing it, as too much can attract pests or create a sour smell. Pair them with compost for balanced nutrition.
What if my hydrangeas still don’t bloom after amending the soil?
Blooming issues can stem from nutrient deficiencies, over-fertilizing, or improper pruning. Check for:
- Correct pH (5.2–6.0) for blue/purple blooms or 6.0+ for pink.
- Balanced fertilizer (e.g., 10-10-10) applied in early spring.
- Pruning old wood (for mopheads) or new growth (for panicle types) at the right time.
Are there alternatives to sulfur for lowering pH?
Try these organic pH adjusters:
- Peat moss (mixes well with garden soil; lowers pH gradually).
- Pine needles or oak leaves (add to mulch; decompose slowly).
- Aluminum sulfate (fast-acting but use sparingly; follow package rates).
- Composted pine bark (improves acidity over time).
How long does it take to see results after amending soil?
Results vary, but you’ll typically notice healthier foliage in 4–6 weeks and better blooms in 2–3 months. For dramatic changes (like color shifts), it may take a full growing season. Consistency is key—keep testing soil and adjusting as needed!
Wrapping up and next steps
Amending your soil for hydrangeas is your secret weapon for stunning blooms! 🌸 By balancing pH, enriching nutrients, and improving drainage, you’re setting the stage for lush, vibrant flowers that’ll make your garden the talk of the neighborhood. Don’t wait—your hydrangeas are counting on you!
Ready to take action? Grab your gloves, test that soil, and start amending today. Watch those blooms transform into a showstopper next season!