
How To
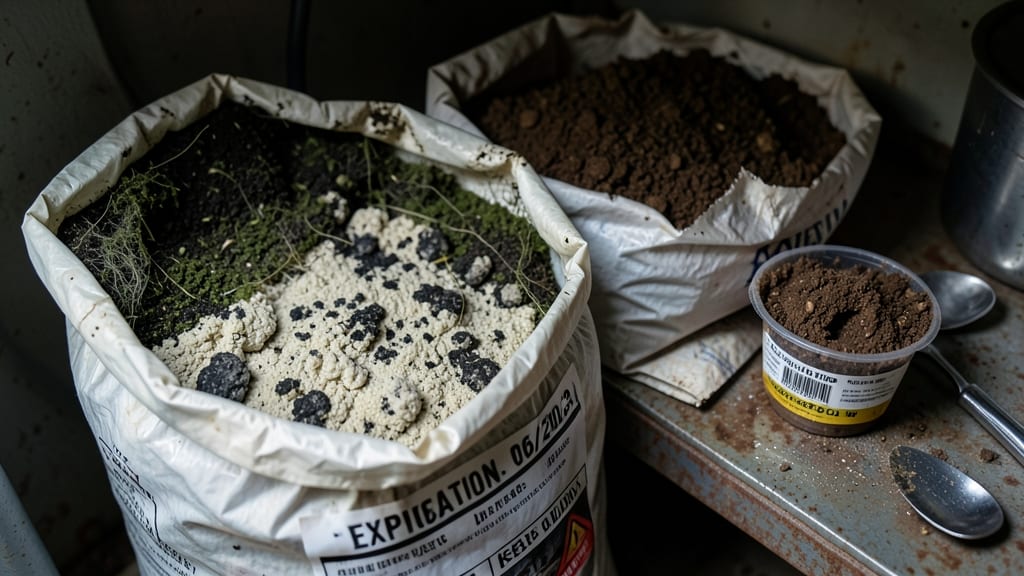
A moldy potting soil bag doesn't mean your plants are doomed. 🌱 I've salvaged more "ruined" soil than I can count—here's how to assess whether it's worth saving or time to compost.
The culprit is almost always excess moisture trapped in sealed bags, especially in humid climates or damp storage spaces. Black or green fuzzy growth? That's mold. Musty smell? Definitely time to act. Discard if you see slimy textures or white cottony spots—those are more serious contaminants.
Start by spreading the soil outdoors in a single layer to dry completely. Mix it 50/50 with fresh potting mix or compost, then use it for non-edible plants. For severe cases, compost the entire bag (with gloves!) to prevent spreading spores to other plants.
Prevention is easier: store bags in dry places, check expiration dates (soil lasts 1-2 years), and use sterilized containers for long-term storage. Your plants—and your lungs—will thank you.
Moisture Overload And Poor Airflow
If you’ve ever opened a bag of potting soil only to find it covered in fuzzy green or black mold, you’re not alone. The most common culprits behind a moldy potting soil bag are excess moisture and poor ventilation.
Let’s break down why these conditions create the perfect storm for mold growth—and how to avoid them.
Mold thrives in damp environments, and potting soil is a nutrient-rich feast for it. When soil is stored in sealed bags, water vapor or residual moisture from the soil itself can’t escape. Over time, this trapped moisture creates an ideal breeding ground for mold spores.
- Why it happens: Many potting soil mixes contain organic materials like peat moss, compost, or bark, which naturally hold moisture. If the soil was recently watered before sealing or if the bag wasn’t fully dried during production, condensation forms inside.
- Science behind it: Mold spores are always present in soil, but they only activate when moisture levels reach above 20-30%. In a sealed bag, humidity can climb to 90% or higher, turning dormant spores into aggressive colonies within days.
- Actionable fix: Always check the bag for dampness before purchasing. If the soil feels soggy or the bag is sweating, it’s a red flag. Store opened bags in a breathable container (like a burlap sack or mesh bag) to allow airflow.
Airflow is the silent hero in preventing mold. When soil sits in an airtight bag, oxygen levels drop, and carbon dioxide builds up—creating a greenhouse effect that accelerates mold growth.
- Why it happens: Most commercial potting soil bags are heat-sealed to preserve freshness, but this also traps moisture and gases. Without circulation, aerobic microbes (the good kind) die off, while anaerobic microbes (which thrive in low-oxygen environments) take over—and they often produce mold.
- Science behind it: Mold like Aspergillus and Penicillium release enzymes that break down organic matter in low-oxygen conditions. These same conditions also slow down beneficial bacterial activity, leaving the soil vulnerable to fungal takeover.
- Actionable fix:
- If you must store soil long-term, transfer it to a perforated container or open the bag and prop it up to allow airflow.
- Use a dehumidifier or silica gel packets in your storage area to absorb excess moisture.
- Avoid stacking bags tightly—leave space between them for ventilation.
Heat and cold swings can turn a slightly damp bag into a moldy mess overnight. Temperature changes cause condensation inside the bag, mimicking a perpetual dew cycle.
- Why it happens: If a bag of soil is stored in a warm warehouse, then moved to a cool garage, or left in a car on a hot day, moisture condenses on the inner lining. This "sweating" effect creates a thin film of water on the soil, perfect for mold spores to latch onto.
- Science behind it: Warm air holds more moisture than cool air. When the bag cools, the excess water vapor condenses—just like how a cold soda can "sweats" on a hot day. This cycle repeats until mold spores find their footing.
- Actionable fix:
- Store soil bags in a cool, dry place (like a basement or garage) away from direct sunlight or heating vents.
- Avoid purchasing soil in extreme heat or humidity—opt for indoor stores with climate control.
- If you see condensation on the bag, do not use it—the mold is likely already spreading inside.
Understanding these root causes is the first step to preventing moldy soil. Next, we’ll cover how to revive moldy soil—or when it’s better to toss it and start fresh.
Revive & Prevent Fungus in Soil
Now that you know why your potting soil bag has gone moldy, let’s tackle the problem head-on with practical, plant-friendly solutions. Whether you’re dealing with excess moisture, poor ventilation, or contaminated soil, these fixes will restore your soil’s health—and keep your plants thriving.
Cause: Too much moisture traps fungi and bacteria, turning your soil into a moldy mess.
How to Fix It:
- 🍳 Air It Out Immediately
- Spread the soil on a clean, dry surface (like a baking sheet or tarp) in a single thin layer.
- Let it dry under direct sunlight or a fan for 24–48 hours. This kills surface mold spores.
- Pro Tip: 🌡️ If the soil is very wet, mix in dry coconut coir or perlite (1 part dry to 2 parts wet) to absorb excess moisture.
- 👨🍳 Improve Drainage for Future Use
- Repot your plants in fresh soil mixed with:
- 50% high-quality potting mix (sterilized)
- 30% perlite or vermiculite (for aeration)
- 20% compost or worm castings (for nutrients)
- Use pots with drainage holes and a cache pot (tray) underneath to catch excess water.
- Repot your plants in fresh soil mixed with:
- ⏰ Adjust Your Watering Habits
- Test moisture before watering: Stick your finger 1–2 inches deep—if it’s damp, wait.
- Water only when the top inch feels dry (varies by plant type).
- Pro Tip: ✨ Use a moisture meter for accuracy, especially for fussy plants like ferns or succulents.
Cause: Soil left unused for months or stored in damp conditions becomes a breeding ground for mold and pathogens.
How to Fix It:
- 🔪 Sterilize the Soil (If Safe to Reuse)
- Baking Method: Spread soil on a baking sheet at 200°F (93°C) for 30–60 minutes (stir halfway). Warning: Don’t overheat—this can kill beneficial microbes.
- Microwave Method: Use short bursts (1–2 minutes max) in a microwave-safe dish. Monitor closely to avoid burning.
- Pro Tip: 💡 Only sterilize if the soil has no visible pests (like grubs or weeds). Otherwise, compost or discard it.
- 🌱 Boost Soil Health with Natural Fungicides
- Mix in 1–2 tbsp of hydrogen peroxide (3%) per gallon of soil to kill mold spores (let it fizz out for 10 minutes first).
- Add 1 part cinnamon or neem powder per 10 parts soil—both are antifungal.
- Prevention Tip: 🎯 Store soil in a sealed, breathable container (like a 5-gallon bucket with a lid) in a cool, dry place (not a garage or basement).
Cause: Fresh soil can still harbor mold if stored improperly or used too quickly.
How to Fix It (Before It Starts):
- 📦 Check the Bag Before Opening
- Squeeze the bag—if it’s soggy or smells musty, return it. Fresh soil should be lightweight and slightly crumbly.
- Pro Tip: 🔥 Avoid "pre-moistened" soil mixes for potted plants—they’re prone to mold.
- 🛒 Buy the Right Soil Mix
- Look for sterilized, peat-free, or coco-based mixes labeled for container gardening.
- Avoid garden soil or topsoil—it’s too dense and retains too much moisture.
- 🗓️ Use It Within 6 Months
- Even sealed bags can develop mold over time. Date your soil bag and use it within 3–6 months for best results.
- Prevention Tip: ✨ Split large bags into smaller containers (like 1-gallon buckets) to reduce exposure to air and moisture.
Final Reminder: 🌿 Healthy soil = happy plants! By addressing moisture, ventilation, and storage, you’ll keep your potting mix fresh and fungus-free for seasons to come. Now grab those gloves and get reviving!
Frequently asked questions
Is moldy potting soil dangerous for my plants?
Moldy soil can harm plants by introducing harmful pathogens like Aspergillus or Penicillium, which may stunt growth or cause root rot. If you see fuzzy growth or a musty smell, avoid using it for edible plants. For non-edible plants, sterilize the soil first (bake at 200°F (93°C) for 30-60 minutes) to kill spores.
Can I still use moldy soil if I mix it with fresh soil?
Yes, but only if the mold isn't severe. Mix the affected soil 50/50 with fresh, sterilized potting mix and add 1 part cinnamon or neem powder per 10 parts soil to inhibit further growth. For sensitive plants (like seedlings), avoid using it entirely—opt for a clean mix instead.
How do I know if my potting soil is too moldy to save?
Discard the soil if you see white cottony spots (indicating Rhizoctonia), slime or foul odors, or if the mold covers more than 20% of the bag. Severe cases may require composting the entire batch (with gloves!) to prevent spore spread. Always check for pests like grubs before deciding.
Why does my potting soil keep getting moldy, even when stored properly?
Some soil mixes contain high moisture-retention ingredients like peat moss or compost, which accelerate mold growth. Store bags in cool, dry places (like a basement) and avoid humidity-prone areas (like garages). Transfer soil to breathable containers (like burlap sacks) to improve airflow and reduce condensation.
Can I use hydrogen peroxide to clean moldy potting soil?
Yes! Mix 1-2 tablespoons of 3% hydrogen peroxide per gallon of soil, stir well, and let it sit for 10 minutes before using. This kills mold spores without harming plants. For extra protection, add 1 part cinnamon powder per 10 parts soil—it’s a natural antifungal agent.