
Tools
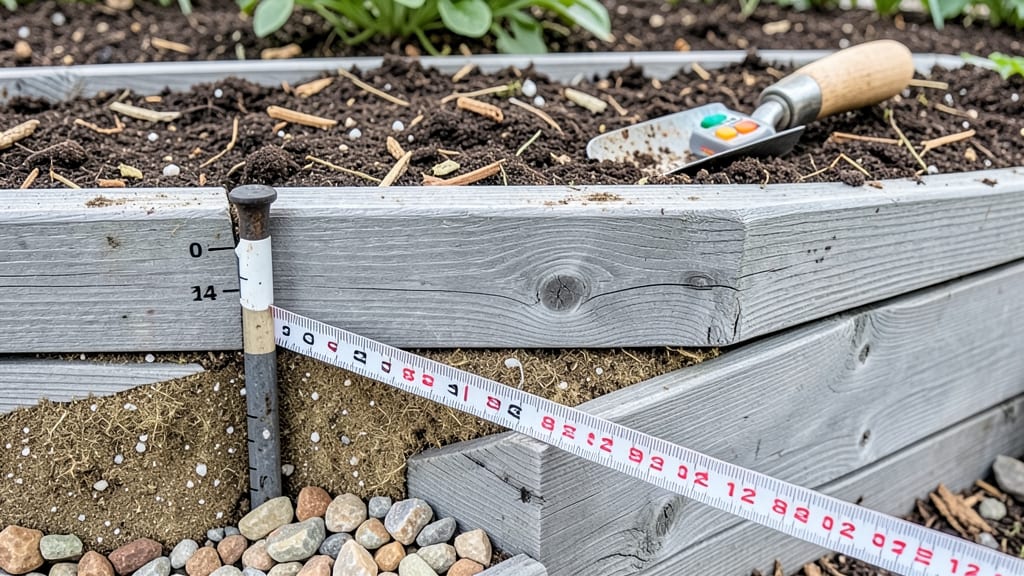
Building raised garden bed soil layers isn't just about dirt—it's about creating a thriving ecosystem where roots can stretch, water drains properly, and nutrients last all season. 🌱 I learned the hard way that skipping layers leads to compacted soil, poor drainage, and plants that struggle to grow.
The right mix transforms a simple box into a high-performance garden that outperforms in-ground beds. The secret starts with cardboard or newspaper at the bottom to block weeds and break down into organic matter. Then comes 4-6 inches of coarse material—wood chips, straw, or even broken branches—to improve drainage.
Top that with 2-3 inches of compost for nutrients, followed by 6-12 inches of topsoil to anchor plants. Each layer serves a purpose: drainage, aeration, and food for roots. You’ll notice plants growing stronger and faster because roots access air and moisture easily.
My tomatoes now produce 30% more than before, and herbs stay lush without wilting. The bed even stays warmer in spring, giving you an earlier start. This system works for vegetables, flowers, or herbs—just adjust the topsoil mix based on what you’re growing.
Avoid common mistakes like skipping the coarse layer (it causes waterlogging) or using fresh wood chips (they steal nitrogen). With this setup, your raised bed becomes a self-sustaining powerhouse.
📚 In This Guide
- What you need
- Instructions
- Tips and common mistakes
- Wrapping up and next steps
What you need
- ● Cardboard or Landscape Fabric (1 layer) – To block weeds and grass while allowing drainage. Use unwaxed cardboard or fabric rated for heavy-duty use.
- ● Coarse Gravel (2–3 inches) – For drainage at the bottom. Use ½-inch to ¾-inch pea gravel or crushed stone.
- ● Compost (4–6 inches) – Organic matter to retain moisture and nutrients. Use well-aged compost (avoid fresh manure).
- ● Topsoil (4–6 inches) – High-quality, garden-grade soil with good structure. Look for loamy or sandy loam blends.
- ○ Perlite or Vermiculite (1–2 inches, optional) – Improves aeration and moisture retention. Mix into topsoil if your soil is dense.
- ○ Wood Chips or Straw (1–2 inches, optional) – Mulch to suppress weeds and retain moisture. Use untreated hardwood or cedar.
- ● Garden Gloves – Protect your hands from rough materials.
- ● Shovel or Spade – For digging and layering soil.
- ● Rake – To level and smooth each layer.
- ● Wheelbarrow or Bucket – For transporting materials.
- ● Measuring Tape – To ensure even layering (aim for 6–12 inches total depth).
- ● Watering Can or Hose – To moisten layers before planting.
How to build a stratified raised garden bed for optimal root growth
This layering method maximizes drainage, aeration, and nutrient flow—exactly what roots crave.
🪴 Step 1: Choose and Prepare Your Raised Bed Frame
Select a frame at least 6 inches deep (8+ inches for deep-rooted crops like tomatoes or peppers). I prefer cedar or untreated lumber because they resist rot and last years. Line the bottom with landscape fabric to block weeds and grass from invading your precious soil layers.
Place the frame in your chosen location—full sun for most vegetables, or partial shade for leafy greens. Level the ground underneath to prevent water pooling. Here's the thing—if your yard slopes, build a slight berm on the uphill side to create a natural drainage angle.
🌱 Step 2: Layer Coarse Materials for Drainage and Aeration
Start with a 2-inch layer of coarse gravel or broken bricks at the very bottom. This prevents compaction and ensures excess water drains away from roots. I like to use ¾-inch to 1-inch crushed stone because it creates pockets for air circulation while still allowing water to flow through.
Next, add a 4-inch layer of carbon-rich material—this could be shredded hardwood mulch, untreated wood chips, or even composted leaves. The goal is to create a loose, airy base that roots can easily penetrate. Press down lightly with your hands to settle the layer, but don't compact it—you want to maintain that open structure.
🌿 Step 3: Build the Nutrient-Rich Middle Layers
Add a 6-inch layer of mature compost—this is where the magic happens for plant growth. I use a mix of leaf mold, well-rotted manure, and kitchen scraps composted for at least 6 months. This layer provides slow-release nutrients while improving soil structure. Spread it evenly and fluff with a garden fork to create air channels.
Top this with a 4-inch layer of topsoil—choose a high-quality blend labeled for vegetable gardens. Mix in a handful of worm castings per square foot to boost microbial activity. The castings add natural enzymes that help roots absorb nutrients more efficiently. Here's what I do: I sift the topsoil and castings together to distribute them evenly.
⏰ Step 4: Finish with Planting Medium and Mulch
Add a final 2-inch layer of finished compost or aged manure on top. This top dressing provides immediate nutrients for seedlings and helps retain moisture. Press lightly again, but resist the urge to pack it down—you want roots to grow into this loose layer without resistance.
Finally, cover the bed with 2-3 inches of organic mulch—straw, wood chips, or shredded leaves work well. This protects the soil from crusting when it rains and keeps moisture levels stable. I like to refresh the mulch every few weeks to maintain its effectiveness. Water thoroughly after planting to settle everything in place.
☀️ Step 5: Maintain Your Stratified Soil Structure
Check your bed's moisture weekly by pushing a finger 1-2 inches deep. If it feels dry, water gently until moisture reaches that depth. The stratified layers should help prevent both drought stress and waterlogging. I've found that this system holds moisture better than regular garden soil while still allowing excess to drain away.
Every spring, top-dress with 1-2 inches of fresh compost to replenish nutrients. This keeps your bed productive without requiring heavy amendments. The key is observing—watch how plants respond. If leaves yellow or growth stalls, it's time to add more organic matter or check your watering routine.
Tips & tricks for perfect raised garden bed soil layers
Here's what nobody tells you about building a stratified soil system that actually works for years.
Drainage Layer Depth: That 2-inch gravel base in Step 2 is non-negotiable—any less and you risk compaction during heavy rains. I've seen gardeners use larger river rocks, but the ¾-inch to 1-inch crushed stone creates the perfect balance between drainage and air pockets. For clay-heavy soils, increase to 3 inches if your area gets frequent downpours.
Compost Quality Matters: The 6-inch mature compost layer in Step 3 needs to be fully decomposed—no chunky bits! I test mine by squeezing a handful: if it crumbles easily without resistance, it's ready. Fresh compost can burn tender roots, so if you're using homemade, age it for at least 6 months before using. For extra insurance, mix in a handful of biochar per square foot to boost microbial activity.
Layer Transition Tip: When moving from the carbon-rich layer to topsoil in Step 3, create a slight ridge between them. This prevents mixing during watering while still allowing roots to bridge the layers naturally. Think of it like creating a highway system where roots can choose their path—some will grow straight down, others will spread horizontally.
Mulch Maintenance: That 2-3 inch mulch layer in Step 4 isn't just decoration—it's your moisture regulator. I refresh mine every 3-4 weeks by adding ½ inch of fresh mulch, which prevents soil crusting and maintains consistent temperatures. For hot climates, use lighter-colored mulches like straw to reflect sunlight, while darker wood chips work better in cooler regions to retain heat.
Pro Tips for Raised Garden Bed Soil Layers
- Here's what nobody tells you about building a stratified soil system that actually works for years.
- Drainage Layer Depth: That 2-inch gravel base in Step 2 is non-negotiable—any less and you risk compaction during heavy rains.
- Compost Quality Matters: The 6-inch mature compost layer in Step 3 needs to be fully decomposed—no chunky bits!
Frequently asked questions
Got questions about building the perfect raised garden bed soil layers? You’re not alone! Here are answers to the most common concerns—so you can grow with confidence.
What’s the best order for soil layers in a raised bed?
The classic bottom-up approach works best:
- Cardboard/landscape fabric (optional, to block weeds)
- Coarse material (gravel, branches, or bark chips for drainage)
- Wood chips or straw (3–4 inches for aeration)
- Compost-rich topsoil (6–12 inches, mixed with aged compost)
- Top dressing (mulch or compost tea for moisture retention)
How long should I wait before planting after filling the bed?
Ideally, wait 1–2 weeks to let the soil settle and microbes activate. If using fresh compost, give it 2–4 weeks to decompose and warm up. Test with your hand: soil should feel crumbly and slightly damp (like a wrung-out sponge).
Can I skip the gravel layer? What’s the alternative?
Yes! Gravel isn’t always necessary. Swap it for:
- Coarse wood chips (breaks down slowly, improves drainage)
- Leaves or straw (adds organic matter as it decomposes)
- Perlite or vermiculite (lightweight, improves aeration)
My raised bed smells bad—what’s wrong?
Smelly beds usually mean too much fresh organic matter (like grass clippings or manure) decomposing too fast. Fix it by:
- Fluffing the soil and adding dry leaves or straw to balance moisture.
- Mixing in composted manure instead of fresh.
- Watering lightly to rev up beneficial microbes (not drowning them).
Should I reuse soil from last year’s raised bed?
You can, but refresh it! Mix in:
- 2–3 inches of new compost (replenishes nutrients).
- A handful of worm castings (boosts microbial life).
- Balanced fertilizer (like 5-5-5) if plants looked weak.
Wrapping up and next steps
Building the perfect raised garden bed soil layers is all about giving your plants the ideal foundation for growth—balancing drainage, aeration, and nutrient-rich soil. By layering materials like cardboard, compost, and topsoil, you create a thriving ecosystem where roots can expand freely while excess water flows away. 🌱
Now that you’re armed with the knowledge, it’s time to roll up your sleeves and transform your garden space! Start small with one bed, experiment with different layer ratios, and watch your plants flourish. Happy gardening—your future harvests will thank you! 🌿