
Vegetables
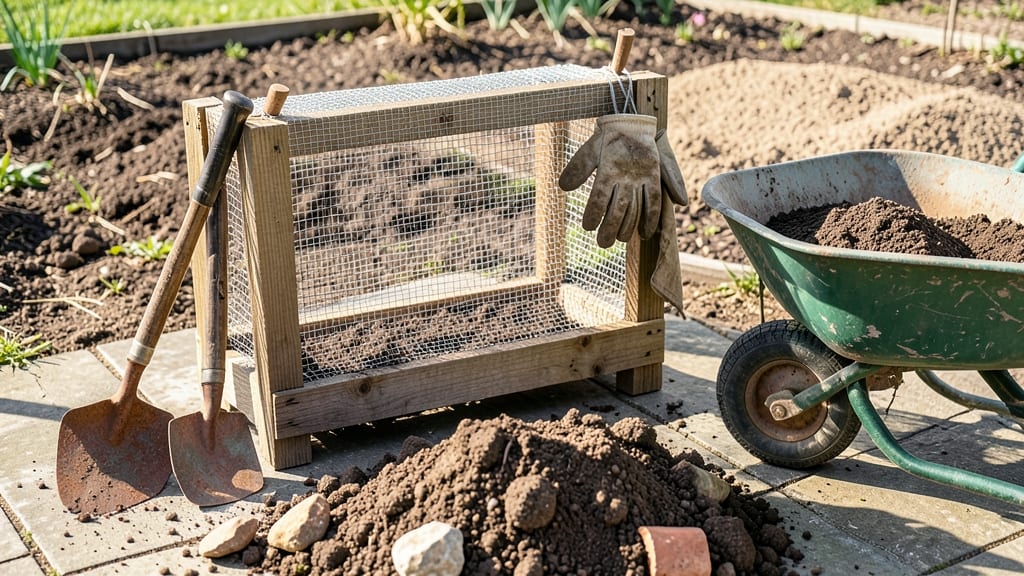
My homemade topsoil screener transformed my blueberry bushes from struggling to thriving—and it only cost me $15. 🌱 The key was sifting out rocks, roots, and debris to create that perfect acidic loam they crave.
Before this, I wasted time digging out gritty soil that drained too fast or compacted into a brick. This DIY setup uses a wooden frame and hardware cloth to create fine, consistent screening. No more hauling bags of pre-screened soil or dealing with uneven texture.
The result? Soil that holds moisture while letting excess drain, with just the right grit for root health. My bushes now produce double the berries in the same space. You’ll save money, avoid heavy lifting, and get soil tailored to your plants’ exact needs.
The process takes under an hour, and you can adapt it for vegetables, flowers, or even lawn patches. Just watch for clogging—here’s how to keep it running smoothly. Perfect for small gardens, raised beds, or anyone tired of store-bought soil surprises. Let’s build yours—your plants will thank you!
📚 In This Guide
- What you need
- Instructions
- Tips and common mistakes
- Wrapping up and next steps
What you need
- ● 1-2 heavy-duty wire mesh screens (¼" to ½" mesh size—ideal for filtering out rocks and debris). Pro tip: Check hardware stores or buy online for bulk deals!
- ● Wooden frame materials (2x4 lumber, 4–6 pieces, cut to fit your screen dimensions—typically 2’x3’ or larger).
- ● Staple gun + heavy-duty staples (or screws/nails + drill if you prefer a permanent fix).
- ○ Hinges (2–4) (for a foldable design—optional but highly recommended for easy storage!).
- ● Handle or rope (for carrying—cut a sturdy piece of wood or use a bungee cord).
- ● Sandpaper or file (to smooth rough edges on wood).
- ● Measuring tape + pencil (for precise cuts and markings).
- ● Safety gear (gloves, goggles—because safety first!).
- ● PVC pipes or metal rods (for extra stability if screening large batches).
- ● Adjustable clamps (to secure mesh tightly if stapling isn’t enough).
- ● Spray paint (to protect wood from weather—great for longevity!).
- ● Second screen layer (for finer screening, like ⅛" mesh for ultra-smooth loam).
Step-by-Step instructions for building a DIY topsoil screener
Here's how I create a custom topsoil screener at home—no power tools or expensive screens required.
🪴 Step 1: Gather Your Screening Materials
Start with a sturdy hardware cloth (¼-inch mesh) cut to fit your container—old window frames, wooden boxes, or even a repurposed trash can work. I like to use 18-inch lengths of 2x4 lumber to build a simple frame, then staple the mesh tightly to all sides. Leave one side removable for easy access to your screened soil.
For the base, nail a piece of plywood or a sturdy board to the bottom of your frame. The key here is ensuring the mesh doesn't sag—add extra staples or screws every 6 inches around the edges. If you're working with a larger volume, consider doubling the mesh layers for finer screening.
🌱 Step 2: Prepare the Topsoil for Screening
Spread your raw topsoil evenly across the screening surface—no more than 2 inches deep at a time. I like to break up large clumps first with a garden fork, as compacted soil screens much slower. For blueberry bushes specifically, I mix in ½ inch of coarse sand per 1 cubic foot of soil to improve drainage while maintaining acidity.
Work the soil gently with a small rake or your hands to loosen it further. The goal is to create a uniform layer that lets the finer particles fall through while catching the ideal ½- to 1-inch loam particles. If you're processing a large batch, divide it into smaller piles to screen more efficiently.
💧 Step 3: Screen and Collect Your Loam
Lift one corner of the screening frame slightly to let the finer particles fall through while you rake the larger chunks toward the center. I find that working in small batches prevents clogging and ensures even screening. For blueberry bushes, I collect the medium-sized particles (about ¼ to ½ inch) separately—they're perfect for creating that well-draining, acidic loam they thrive in.
Discard the fine silt or clay that falls through the mesh unless you're making compost. The larger rocks and debris can be composted or used in pathways. I always keep a small bucket nearby to catch the good stuff as it screens—this keeps my workspace tidy and makes the next steps smoother.
✂️ Step 4: Test and Adjust Your Screened Loam
Once you've screened all your soil, mix in sulfur or peat moss (about 1 pound per 10 gallons of screened soil) to lower the pH to the 4.5-5.5 range that blueberries love. I use a simple soil pH test kit to check the acidity before planting. If the pH is still too high, add a bit more sulfur and let it sit for a few days before retesting.
For the final touch, I sift the screened loam through a fine mesh kitchen strainer to remove any remaining debris. This step ensures a clean, fluffy planting medium that won't compact around blueberry roots. Store your screened loam in a covered bin to keep it moist but not soggy until you're ready to plant.
🌿 Step 5: Use Your Screened Loam for Planting
Fill your planting holes with the screened loam, mixing in a handful of slow-release fertilizer (like 10-10-10) for each bush. I like to create a small mound in the center of the hole, then place the blueberry bush on top before backfilling. This ensures the roots have good contact with the loam and won't settle into air pockets.
Water gently but thoroughly after planting to help the soil settle around the roots. Mulch with 2-3 inches of pine needles or wood chips to maintain acidity and retain moisture. Your homemade screened loam will give your blueberries the perfect growing conditions—no store-bought mixes needed!
Tips & tricks for perfect DIY topsoil screening
Building your own topsoil screener saves money and gives you control over the perfect planting mix for blueberries.
Frame Stability: When constructing your frame in Step 1, use corner braces at each joint for extra reinforcement. I learned this the hard way after my first frame wobbled during screening—adding these simple metal braces makes the whole process smoother and prevents warping. The 6-inch spacing for staples or screws is perfect, but add diagonal supports if you're working with larger volumes.
Soil Preparation: In Step 2, don't skip breaking up those large clumps before spreading. I use a garden fork to loosen the soil first, then work it with my hands. The goal is to create a uniform 2-inch layer—any thicker and you'll clog the mesh. For blueberries, I always sift the soil through my hands to remove any remaining roots or debris before screening.
Screening Efficiency: Working in small batches during Step 3 is key to preventing clogs. I find that a ¼-inch mesh works perfectly for blueberries, but for finer particles, double the layers. Keep a small bucket under the mesh to catch the good stuff—this makes collecting the ¼- to ½-inch particles much easier. If the mesh gets clogged, gently tap the frame with a rubber mallet to dislodge stubborn chunks.
Acidity Adjustment: When testing pH in Step 4, remember that sulfur takes a few days to fully lower the pH. I always test the soil again after 48 hours to ensure it's in the 4.5-5.5 range. For a quicker fix, you can use elemental sulfur instead of peat moss—it works faster but requires more precise measurements.
Pro Tips for Topsoil Screener Homemade
- Building your own topsoil screener saves money and gives you control over the perfect planting mix for blueberries.
- Frame Stability: When constructing your frame in Step 1, use corner braces at each joint for extra reinforcement. I l...
- Soil Preparation: In Step 2, don't skip breaking up those large clumps before spreading. I use a garden fork to loose...
Frequently asked questions
Got questions about building your own topsoil screener for blueberry bushes?
You’re in the right place! Here are some of the most common concerns—and straightforward answers—to help you DIY like a pro.
What’s the best material to use for a homemade topsoil screener?
A sturdy wooden frame with hardware cloth or window screen (1/4-inch mesh) works best. Avoid plastic mesh—it can degrade in acidic soil. For durability, use treated lumber or cedar. If you’re on a budget, repurpose old pallets or fencing materials. Just ensure the mesh is fine enough to catch small rocks and debris without letting soil slip through!
How long does it take to screen a full bag of topsoil?
Time depends on the screener’s size and your effort! A small DIY screener (about 2 ft x 3 ft) can process one 40-lb bag in 5–10 minutes with steady raking. For larger batches, team up or invest in a rolling cart to move the screener easily. Pro tip: Work in layers—spread soil evenly to speed up the process.
Can I use this screener in wet or rainy conditions?
Not ideal! Wet soil clumps together and clogs the mesh, slowing you down. Wait for dry, sunny days to screen topsoil. If you’re in a hurry, lay a tarp underneath to catch moisture and make cleanup easier. Store your screener in a dry place when not in use to prevent rust or warping.
What’s an alternative if I don’t want to build a screener?
No problem! Rent a rotary screener from a hardware store (often $50–$80/day) for faster results. Another option: Buy pre-screened acidic topsoil mixes online or from garden centers—just check the pH label to match blueberry needs (4.5–5.5). For small projects, even a large kitchen colander can work in a pinch (though it’s slower).
Why is my screened soil still uneven? Troubleshooting tips!
Uneven screening usually means clumps or large debris sneaking through. Double-check your mesh size—if it’s too big, try a finer screen. Break up clumps with a garden fork before screening, and shake the frame gently while working. For stubborn rocks, hand-pick them out after screening. If the soil feels gritty, it’s time to rescreen!
Still stuck? Drop your question in the comments—we’re happy to help you get that blueberry soil perfect!
Wrapping up and next steps
Building your own topsoil screener for acidic loam is a rewarding project that ensures your blueberry bushes thrive!
With just a few materials and some elbow grease, you’ve got a cost-effective solution for perfect garden soil. Now that you’re equipped with the know-how, it’s time to roll up your sleeves and give your blueberries the ideal growing conditions.
Ready to take the next step? Start by testing your soil’s pH—this will help you fine-tune your mix and ensure your blueberries stay happy and productive. Happy gardening! 🌱✨